
How to Set Up an Amazon Seller Account, Seller Central and Brand Registry
 Updated on November 19, 2026
To set up an Amazon seller account, you register in Seller Central, choose the Individual plan ($0.99 per item sold, no monthly fee) or the Professional plan ($39.99 per month), complete the tax interview and verify your identity. This guide walks through each step, then shows how to set up Seller Central, register your brand and track the reports that buyers check when you later sell the business.
It might seem a little intimidating to set up your Amazon Seller account, especially if this is your first online retail business. Luckily, it’s really simple, and as long as you’ve got all the pieces in place, you’ll be selling in no time.
It’s important to take the time to prepare your store for customers, but once your account is all set up, you can add your inventory and get your store up and running!
Before diving into the step-by-step process of setting up your Amazon Seller account and your Seller Central space, there are a few things you need to have completed ahead of time to make sure the setup process goes as smoothly as possible:
- Figuring out what you’re selling and how you’re sourcing your product are the most time-consuming parts of setting up your FBA business. Make sure you’ve already done these tasks before you go through the effort of setting up your account so you can start selling right away. If you haven’t done this step yet, make sure you do your research on what products will help you excel as an Amazon Seller.
- Besides knowing what product you’re selling, you should probably decide on the name of your store before you create your account. Are you going to use your individual name, or do you have a business or brand name already decided on?
- Most importantly, you need to know if you’re going to be creating the account as a business (also known as an LLC) or as an individual (sole proprietor). Amazon has two different account options for FBA sellers depending on their situation, but you’ll also need to have this decision made ahead of time for tax purposes, since you’ll need to fill out tax forms while setting up your account. (Yay, taxes!)
Once you have these things squared away, you’ll have all the key background information that will help you set up your store in a super-streamlined fashion.
If you’d like to buy an Amazon FBA business that’s already making a profit, then you can register for a free Empire Flippers account.
Do You Need an LLC to Sell on Amazon?
No. You can sell on Amazon as a sole proprietor or through an LLC. A sole proprietor is fully liable for business debts with their own assets, while an LLC keeps business and private assets separate. Decide before you register, because Amazon asks for your legal name and tax details during setup.
You’ll face an important question that will dictate how your Amazon business runs and operates right from the start: would you want to run your business under your ownership as a sole proprietor or as an LLC (Limited Liability Company)?
You don’t need an LLC to start selling on Amazon. You can register as an individual seller, or you can use an existing business entity such as an LLC or corporation.
If you are unsure about your commitment to a large FBA business and experimenting with growing your business, a sole proprietorship or operating as an “individual” on Amazon (we’ll get into that in the next section) may grab your attention. But it does come with a catch.
As a sole proprietor, you’ll have unlimited liability, meaning all assets and debts are owned by you. This puts you at risk because you will be directly liable in the case of any legal action taken against your business. If you owe debt larger than your business assets, you could lose personal assets to pay that debt.
In the case of an LLC, you would be protected as your business is an established entity that can be held liable in the case of legal action. With an LLC, business and personal assets are separate.
So why would anyone set up a sole proprietorship you ask? It’s the easiest and cheapest way to become one of Amazon’s sellers. You don’t have to go through the hassle of registering the business and establishing business income like with an LLC. Establishing an LLC generally costs more, and on Amazon it also means you will be responsible for business fees. Those fees would be nested under the Amazon Professional Seller Central account, which you would likely choose that option if creating an LLC.
Choosing an LLC or sole proprietorship will determine your next crossroads when creating your Amazon seller’s account. Will you go with an individual or professional seller account under Amazon Seller Central?
Amazon Individual vs. Professional Seller Account
It might sound like a no-brainer question (“Of course I’m a professional!”), but these are Amazon’s choices for your seller account plan. It’s worth exploring your options before you start the process of creating your account, since there are pretty big differences between the two.
Your business structure is separate from your Amazon selling plan. You can choose an Individual or Professional selling plan regardless of whether you operate as an individual or through a business entity.
Amazon currently describes the Individual plan as intended for sellers doing fewer than 40 items per month, while the Professional plan is intended for higher-volume sellers and provides additional tools such as advertising, bulk listings, and detailed sales reports.
The Individual seller plan doesn’t have a monthly fee, and this pricing plan is pretty appealing if you’re just starting out and in a more experimental mode with your products.
If you’re feeling pretty confident that your item’s going to sell like hotcakes, however, it might be worth it to pay $39.99 per month to be a Professional seller. That way, you won’t have to pay Amazon $0.99 for each item sold, which is the fee that Individual sellers have to pay.
If you want to wait and see how your FBA does, you can start as an Individual and upgrade your account to the Professional selling plan at any time. There’s a lot of overlap between the two plans: both Individuals and Professionals have to pay shipping, referral, and closing fees, all explained on Amazon’s website. And both Professional and Individual sellers can list their products in more than 20 categories, but Professional sellers can include their products in 10 extra categories.
Whichever plan you choose, the process of creating your Seller account is exactly the same.
| Plan | Cost | Best for | What you get |
|---|---|---|---|
| Individual | $0.99 per item sold, no monthly fee | Fewer than 40 items a month | Basic listing and order tools |
| Professional | $39.99 per month | 40 or more items a month, or any seller building a brand | Advertising, bulk listing and reporting tools |
Amazon’s selling fees, and FBA fees if you use FBA, come on top of the plan cost. You can upgrade from Individual to Professional at any time, so start with the plan that fits your expected volume.
How to Set Up an Amazon Seller Account in 6 Steps
Setting up an Amazon seller account takes six steps. Have your ID, bank account, credit card and tax number ready before you start.
1. Gather Your Amazon Seller Account Information
Before jumping onto Amazon’s website in the exciting rush to open your new FBA business, make sure you have these essential items right next to you: 1) a credit card that can be charged internationally, 2) your bank account information, such as your routing and account numbers, and 3) your tax identification information, either for yourself or your business.
Once you’ve got these details, you’ll want to make your way to Amazon’s home page. Scroll to the bottom of the page and find the list titled “Make Money with Us.” Then, click on “Sell on Amazon.” It’ll take you to a page that looks like this:

Hope you’re ready to start selling, because that’s the button you need to click to start the process! Now you’ll enter the “Seller Central” side of Amazon. (*cue the oohs and ahhs*)
2. Create Your Seller Central Account
Next, you’ll need to create an account. Or, if you’re one of 250 million people who’s already an Amazon Prime member, log in to your account using the link below the form.

If you’re someone who likes to separate business and personal emails, you may want to use a different email than the one associated with your Amazon Prime account. Since you’re setting up your FBA business using this login, you’ll start getting emails about your orders and other business transactions. One thing to note is that for every Seller Central account you open, it must have a unique email attached. So if you are excited about starting FBA businesses and thinking ahead to selling your business with us, all of your accounts must have separate emails.
If you don’t already have a business email and you’d prefer to keep things separate, it’s simple enough to set up a Gmail account just for your business before you log on to Amazon.
3. Enter Your Business Information
Once you’ve created your account or logged on with an existing account, you’ll be asked to enter your legal name. Think of it this way: who’s paying the taxes for this business?
If you’re setting up your Seller account as an individual, use your name and tax identification information. Otherwise, stick with your business’s name and information.
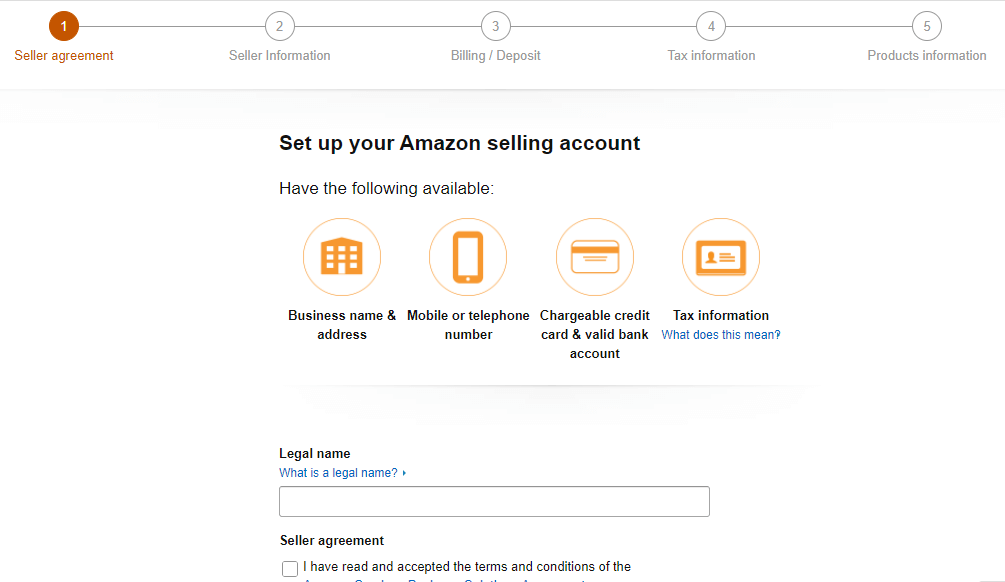
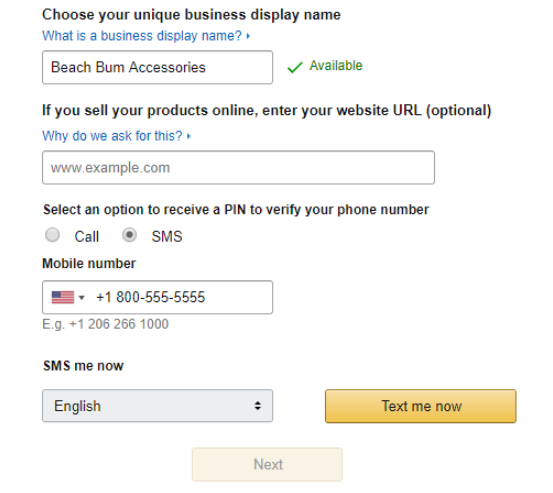
Once you’ve entered this information, Amazon will ask for your business’s address. This is also the page where you’ll enter the unique display name for your business that everyone on Amazon will see. Amazon lets you know if the name has already been taken. I got lucky with the name and phone number for my fake business, as you can see below:
4. Choose Your Selling Plan
Amazon will then ask for a billing method, so you’ll need to whip out that internationally recognized credit card and banking information.

Once you’re on this screen, they’ll verify the selling plan that you chose. You’ll see here that I selected a Professional plan. Since you’re setting up a FBA account, make sure to check the box!
5. Complete Your Tax Information
One of the last steps in this setup process is entering your tax identification information in a “tax interview” process. Essentially, Amazon needs to register you in their system because they have to keep track of all the third-party sellers that they cut checks to. (And the lovely people at the IRS demand this information, of course.) As a mandatory step in this process, you’re basically filling out a W-9 form.

During the tax interview, you’ll have to select whether you’re a sole proprietor or a business. The major difference (besides all the nitty-gritty details in the paperwork about taxes) will be that sole proprietors/individuals will use their Social Security Number (SSN) instead of an Employer Identification Number as their tax identification number.

Amazon validates and provides you with a W-9 form pretty quickly after you’ve submitted your information. Yay, technology!
The last step in setting up your Seller account is providing general information about your products, but this is optional — you can skip it and fill it out at a later time.
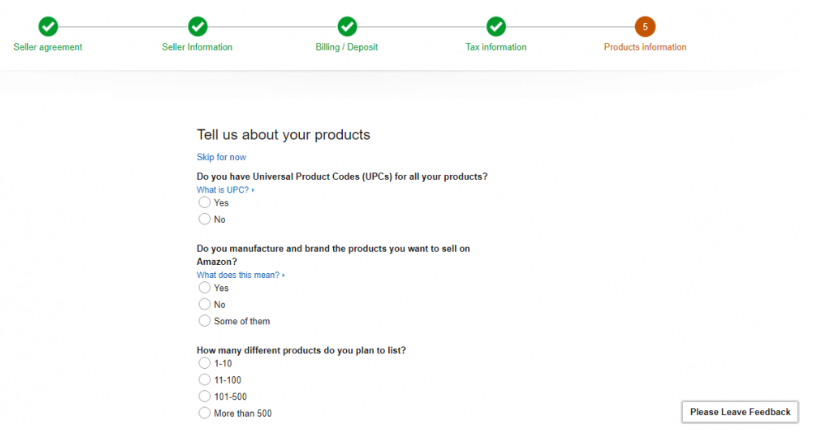
After these five steps are complete, your Seller account is all set up. Now the fun really starts — it’s time to explore Seller Central.
6. Verify Your Identity
Amazon’s current registration guide says sellers may need to provide:
- Government-issued ID
- Proof of residential/business address
- A face + ID photo or video verification with an Amazon associate
How to Set Up Amazon Seller Central Correctly
Seller Central is the space that Amazon provides for you to set up your FBA business, manage inventory and orders, and so much more. You can reach Seller Central by going to sellercentral.amazon.com and logging into your account.
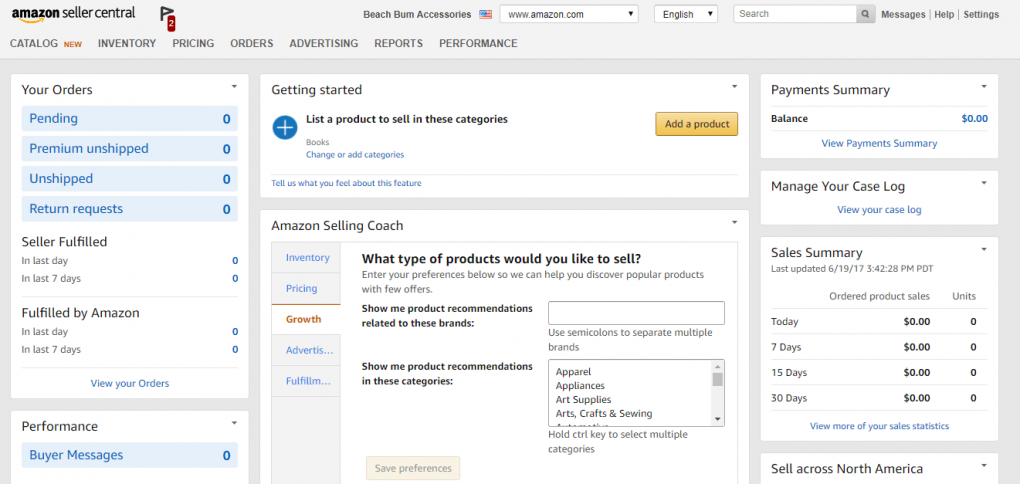
Once you start exploring Seller Central, you’ll discover that it’s pretty user-friendly. Start by exploring the different drop-down lists on the upper left side — Inventory, Orders, Advertising, Reports, and Performance — to familiarize yourself with what these areas look like.
If you check out the drop-down list for “Inventory,” you’ll see “Manage FBA Inventory.” As an FBA business, you’ll become pretty familiar with this page, full of your Amazon-fulfilled inventory.
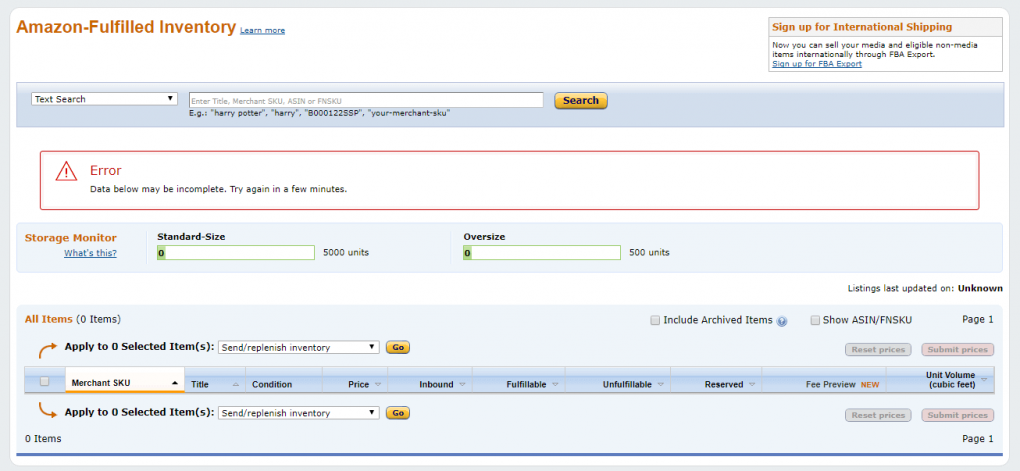
When you’re ready to enter your first product, you can select “Add Product” from the “Inventory” drop-down list and follow the steps.
Under “Advertising,” you can create and manage Amazon Ads campaigns to help customers discover your products.
“Performance” will probably be one of your most-utilized subsections, and for good reason. Amazon provides you with an Account Health Dashboard that breaks down customer service, product compliance, and shipping performance, letting you see how your business is doing in a more detailed way (rather than basing performance solely on sales).
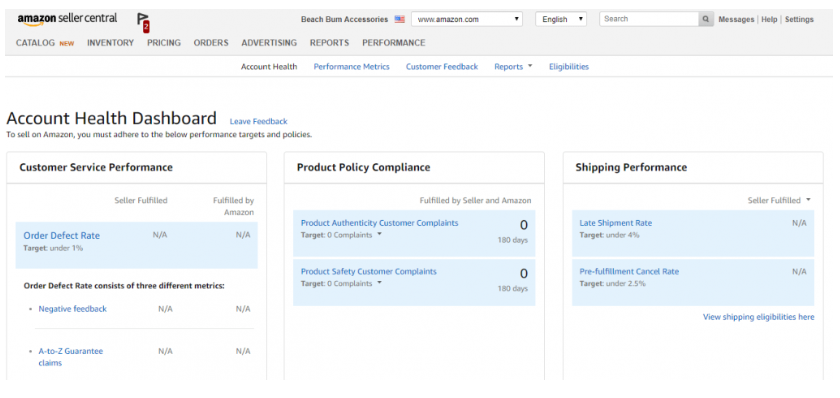
After exploring the major parts of Seller Central, it’s time to finalize a few details to get your FBA business ready to sell some products. Seller Central is your domain, so it’s helpful to set it up with certain administrative preferences before adding inventory to your store.
First, double-check that all of your information is correct, such as your business’s name, the billing address and information, and the return method. To find this page, click on “Settings” in the top right corner, and from the drop-down list, select “Account Info.”

The items circled in red are the places you’ll want to double-check, just to make sure all of the information is correct. If you changed your mind about your business name, here’s your chance to edit it. If you want to add another charge method or need to make sure you put your information in correctly, click on “Charge Methods.” And for “Return Information,” you’ll want to verify that the address of the return location is where you want it to be; if there are any issues with your Amazon product, people will need your return information, but it better be returned to the correct place!
On the Seller Account Information page, you can also change your email preferences, check your tax information, update your business address or legal entity, and essentially make any changes you’d like on the administrative side.
After checking all this information, return to the Settings drop-down list and select “Your Information & Policies.” It’s time to tell the world who your business is and what you’re all about!
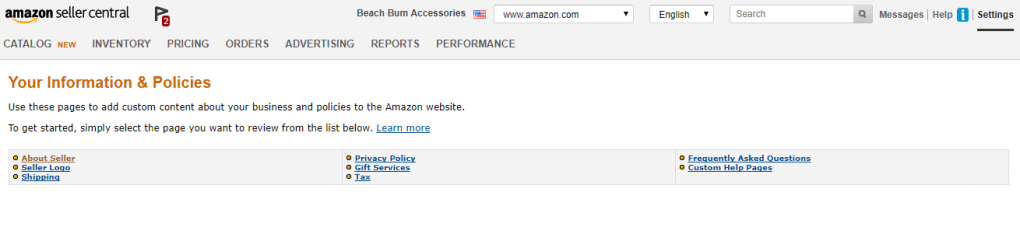
Select “About Seller” to provide a brief description of who you are or a blurb about your company — this will be what your customers read when deciding whether or not to buy from you. You can also add your company’s logo, as well as your privacy policy and FAQs.
One of the most important items on the Settings drop-down menu is “Fulfillment by Amazon” — since, you know, your whole business model is based on the Amazon FBA concept.
On the Fulfillment by Amazon Settings page, you’ll find a whole lot of sections. Take time to peruse each of the subsections to learn all about the optional settings, inbound settings, repackaging, and multi-channel fulfillment, to name a few.
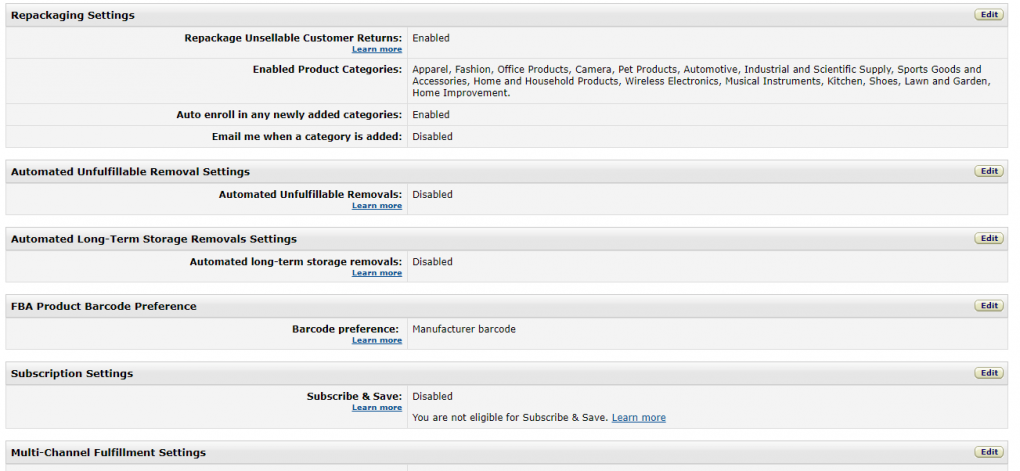
It’s especially important to take note of the Repackaging Settings and the Automated Unfulfillable Removal Settings to make sure they’re set to your preferred setting. These will affect the inventory you have and how quickly you can move new inventory, too.
Before your first listing goes live, check four settings: your legal business name and display name, your return address, your deposit method, and your FBA settings for repackaging and unfulfillable inventory. If you use FBA, create your first FBA shipping plan once these are in place.
Why Amazon Brand Registry Matters
Amazon Brand Registry protects your listings from hijackers and copycats and gives you better tools for your product pages. For a private label business, it is also one of the clearest signals to a future buyer that the brand is yours and can be defended.
Brand Registry Requirements
- A pending or registered trademark.
- A word mark, not a stylized, illustration or design mark. For USPTO marks, the Mark Drawing Type must be ‘4 – Standard Character Mark’ or ‘1 – Typeset Word(s)/Letter(s)/Number(s)’.
- Trademark details that match the trademark office record exactly, including capitalization and spacing.
- Your registration or serial number, brand logo, product and packaging images showing the brand, product categories, and the countries where products are made and sold.
The USPTO works for sellers who sell only in the US. If you sell or plan to sell in Europe or other markets, WIPO’s Madrid System may suit you better. Amazon does not charge to enroll, but trademark filing fees run about $225 to $400 per application.
What Brand Registry Unlocks
- A+ Content: richer descriptions and images on your product detail pages.
- Reporting tools: report violations from a dedicated dashboard, with a team that handles infringement claims.
- Search tools: find possible infringements by product name, ASIN, brand name, search terms and images.
- Brand Analytics: shopper search and purchase data, covered in the next section.
See our full Amazon Brand Registry guide for the step-by-step enrollment process.
Core Amazon Seller Reports and Metrics to Track
Once you start selling, three areas of Seller Central tell you whether the business is healthy: Business Reports, Account Health and, for brand owners, Brand Analytics. Check them weekly.
Business Reports: Sales and Traffic
Find these under Reports, then Business Reports. The Sales and Traffic reports, by date and by ASIN, show sessions, page views, units ordered, ordered product sales and unit session percentage, which is your conversion rate. Falling sessions point to a visibility problem. Steady sessions with falling conversion point to a listing, price or review problem.
Account Health
The Account Health Dashboard under Performance shows your Account Health Rating, order defect rate, late shipment rate and any policy warnings. Problems here can lead to suspension, so fix every warning as soon as it appears.
What Brand Analytics Tells You
Brand Analytics is open to brand owners enrolled in Brand Registry. It shows the search terms shoppers use to find products like yours, which products they click and buy instead, and how often customers come back to buy again. Use it to sharpen listing copy, guide ad spend and spot new product ideas.
Common Amazon Seller Account Setup Mistakes
- Using your private Amazon shopping login. Create the seller account with a separate business email.
- Mismatched details. Your legal name, bank account and tax information must match your ID and business documents, or verification stalls.
- Mixing private and business money. Use a separate business bank account from day one, so your profit is easy to prove.
- Staying on the Individual plan too long. Above 40 items a month, the Professional plan costs less and unlocks advertising and reporting tools.
- Ignoring Account Health. Unresolved warnings put the whole account at risk.
How Your Account Setup Affects Growth and Exit Value
A clean setup pays off twice: it lets you grow without account problems, and it makes the business easier to sell. Amazon FBA businesses are the largest share of deals on Empire Flippers, at 36.1% of transactions in 2025, and buyers check the same things every time:
- Stable earnings, backed by a clear profit and loss statement. The P&L is the most important document in a sale.
- A registered trademark and Brand Registry, which make the brand defensible and can raise its value.
- A healthy account with no unresolved policy warnings.
- Clean records that keep business and private finances apart.
Amazon FBA businesses typically sell for 1.6x to 3.7x annual profit, and businesses on our marketplace sell after 131 days on average. When you sell, our migrations team handles the account transition at no extra cost. Learn how to value an Amazon FBA business, or get a free valuation to see what yours is worth today.
Building an Amazon brand you may sell one day? Find out what it is worth today. It takes a minute or two.
Sell your Business Free Valuation
Next Steps for New Amazon Sellers
With your account and Seller Central set up, the next steps are choosing a product, building a brand and planning fulfillment.
- Find a product with our Amazon FBA product research guide.
- Pick a business or brand name you can trademark, and read how to build a brand on Amazon.
- Learn how the Amazon FBA business model works and how to start an Amazon FBA business.
- Prefer a head start? Browse Amazon FBA businesses for sale that already have a track record.
Already running an FBA brand? See how to sell an Amazon FBA business, or sell your business with Empire Flippers.
Amazon Seller Account and Seller Central FAQs
How do I set up an Amazon seller account?
Go to sellercentral.amazon.com, create a login with a business email, enter your legal and business details, choose a selling plan, complete the tax interview and verify your identity. Have a government-issued ID, a bank account, a credit card and your SSN or EIN ready. The six steps above show each screen.
How much does an Amazon seller account cost?
The Individual plan has no monthly fee and charges $0.99 per item sold. The Professional plan costs $39.99 per month. Amazon’s selling fees, and FBA fees if you use FBA, come on top of either plan.
What is the difference between an Individual and Professional Amazon seller account?
The Individual plan suits sellers with fewer than 40 sales a month and charges per item. The Professional plan costs a flat $39.99 per month and adds advertising, bulk listing and reporting tools. You can upgrade at any time.
Do I need an LLC to sell on Amazon?
No. You can sell as a sole proprietor or through an LLC. An LLC keeps your own assets separate from the business, while a sole proprietor is fully liable for business debts.
Can I sell on Amazon without using FBA?
Yes. You can fulfill orders yourself, known as Fulfillment by Merchant, and still use Seller Central for listings, orders and reports. With FBA, Amazon stores, packs and ships your products for you. Read how the Amazon FBA business model works.
How much does it cost to set up Amazon FBA?
Opening the account costs $39.99 per month on the Professional plan, but inventory is the real cost. FBA is capital-intensive: as a rough guide, about one third of revenue goes to product costs, one third to Amazon costs and one third is profit. Budget for your first stock order, shipping to Amazon and a trademark filing of about $225 to $400.
What does Brand Registry unlock for sellers?
Brand Registry gives you A+ Content for richer product pages, tools to search for and report infringements, a dedicated brand dashboard and access to Brand Analytics. You need a pending or registered word trademark to enroll. See our Amazon Brand Registry guide.
Which reports matter most in Seller Central?
The Sales and Traffic Business Reports and the Account Health Dashboard matter most. Business Reports show sessions, page views, units ordered, sales and conversion rate by date and by product. Account Health shows defect rates and policy warnings that can put the account at risk.
How do analytics help you improve margins?
Analytics show where money is lost. Business Reports reveal products with traffic but low conversion, Brand Analytics shows which search terms lead to sales, and your P&L shows how much each sale costs after Amazon fees and ads. Cut ad spend on terms that do not convert and fix listings that underperform.
What account setup issues scare off buyers?
Buyers back away from unstable earnings, unresolved Account Health warnings, unregistered brands and records that mix private and business money. A clear P&L, a registered trademark and a healthy account make a business easier to sell. Get a free valuation to see where yours stands.

Discussion
Hi, thank you! I’m trying to open an individual seller account on Amazon. But after a enter my SSN and bank account they asked me a picture of my driver’s license and of my bank account statement. Is that normal? Thank you
Hey Sarah,
I’m not sure but I could see Amazon moving into this direction if they haven’t already. You might want to join some Amazon FBA facebook groups like Amazon FBA High Rollers, they might be able to help you with setting up an account better
Hi Greg. Regarding your comment about Amazon customer support. I have to say that I’m impressed with the responsiveness of their customer support agent. I’m an Amazon FBA seller for a few years now and I’ve seen some of the worst customer service reps from other giant sellers (that I will hide using the alias, Walmart). To be fair, Walmart seller center has really improved their customer support in just a few months. But it’s still way behind Amazon FBA support.
Aye, it seems these bigger companies feel like they don’t need to have stellar customer support – and in many cases they’re right in their own way.
Amazon is by far not the worse support out there when it comes to helping their merchants sell on their platform, but I personally believe the experience could be vastly improved. If Amazon had the same level of support for merchants/FBA sellers as they had for their consumer facing shop when a customer creates a ticket, I think it would be a radically different environment in a far more positive way.
Still, like you said, could be way worse haha
I have set up an individual seller’s account and am ready to begin selling books.
I don’t expect to sell more than 40 a month.
I am finding lots of info on setting up FBA accounts but less for individual. How do I begin?
Hey Dianne,
If you’re having issues with setting up your FBA account I would suggest talking to Amazon support directly. Though you might be able to find some helpful answers in some facebook groups like the Amazon FBA High Rollers group
Hi, I have been tasked with setting our company up on Amazon (we are thinking USA right now) but have no clue where to start. Can you point me in the right directions.
Hey Ross,
I would suggest looking in a few facebook groups like the Amazing Seller or Amazon FBA High Rollers to help you out
I want to make seller account and i’m from Egypt, is it necessary having bank account in American bank, what are options for me?
Hey Shaimaa,
I don’t believe you’d need to have an American bank account to set up an Amazon Seller account. But you’ll want to reach out to their support and ask them
Thank you for this guideline you made it very easy and clear for me as I will be launching a sellers account soon. Only one question, I have read a lot about UPC codes and how each product you sell needs one and how you should buy them direct from amazon but you did not include this step in your example. May i ask why?
Hey Maureen,
I might be wrong on this, but I believe you can buy UPC codes outside of Amazon too. Though buying them from Amazon is probably the simplest method to go about it.
You can request UPC exemption, but I’m not really sure if there’s an advantage to do that. My recommendation would be to join an FB group like Amazon FBA High Rollers and ask questions about UPC there, as they’ll have more up to date knowledge since they’re doing FBA day-in/day-out.
Hi
Thanks for sharing this article .
I had made a seller central account but account got suspended don’t know why.
I have also provide the required documents still amazon told us that i am not able to sell on amazon.
can you please help me in this.
Hey Shobhit,
I would recommend asking this question in one of the many FBA facebook groups that exist out there. They might be able to help you figure out your specific issue. There’s one called Amazon FBA High Rollers that has quite a few members in it that might be able to help
Hi, can i know more about the referral fees & variable closing fees stated to pay after we set up an account.
And also, the fulfillment methods avaiable?
Thanks!
Hope to hear from you soon!
Hey MK!
We don’t get any referral fees if you set up an Amazon Seller Account. It’s totally free to do, so if FBA is the route you want to go then I’d suggest just following Amazon’s directions.
They’ll walk you through how their fulfillment works in more detail in your account
Hi
Thanks for sharing this article! I have a question that I cant seem to find answers to and I was hoping you could help.
I have a business partner and we are both Directors of a company.
We would like to open a professional account in Amazon in our business name to sell our products. Am not sure how to go about opening a seller account that can be administered by multiple people. Most examples I find require an individual to log in and set up the account.
Do I log in as an individual, set up the account with a business email account and then we both use this email address to log in and administer the account. Will Amazon allow me to list 2 individuals to administer the account
Thanks for your help.
Rose
Hey Rose,
Just to be sure, I would contact Amazon Seller’s Central help support with your question.
From what I understand though, having your Seller Central Account set up as the business entity should be the way to go. You’d have to share those login credentials with your business partner, so you’d effectively be using the same login. At the moment, I don’t believe there is a way to get around this.
Good morning,
Prior to me selling anything on Amazon my pro sellers account was rejected.
The only thing I couldn’t provide was a utility bill, which I’m working on.
Do you help with such things and if so, what’s your charge?
Sadly we don’t. I would keep contacting Amazon to see what you can do to get your account approved