How to Set up a Shopify Store Quickly
 Updated on February 29, 2020

Whether you are dropshipping products or private label, you are going to need a storefront to showcase your products and give your brand exposure outside of platforms like eBay or Amazon.
While these platforms give you a place to sell your products, you have minimal control over how your products are listed, and you have to compete with other merchants all vying for the attention of your customers.
Having your own store gives your brand a home on the web, while also giving you far greater control over how your products are represented and how you sell them online. You can collect customer emails when they visit your page, and with some platforms, you can control the messaging by creating your own blog content. You can even retarget customers, if they abandon their shopping carts, directly through Facebook ads, or use Pay Per Click (PPC) to drive traffic to your store (where customers can browse without being distracted by your competitors’ products).
While there are many shopping platforms out there, Shopify is by far the most popular and widely used. Let’s take a look at why this is the case, if a Shopify store is right for your business, and how to set one up.
Why to Consider Shopify for Your Business
Most ecommerce owners either don’t have the technical know-how or simply don’t want to deal with building an online store. They want to focus their efforts on what they are good at — selling products!
This is hands down the biggest reason over 375,000 ecommerce business owners have flocked to the Shopify platform: It looks great, is easy to use, and takes payments seamlessly. But there are a few things that every online retailer should know before deciding if Shopify is the right platform for them.

Shopify Pros – You Should Use Shopify If…
…you are looking for something that doesn’t require coding, lets you choose your domain name, and can process your orders and payments.
It’s plug-and-play and super easy to use. Design is a piece of cake, and there are tons of free themes which you can modify using the built-in store editor.
You can purchase a domain name for your store directly from Shopify and have it connected and live in minutes. This is really convenient and removes the need for you to go to a domain registrar, like Namecheap. However, if you already have a domain, Shopify also makes it super easy to connect it to your store.
Shopify has built-in order tracking and payment processing, making it super easy to just start selling. If you sell products on Amazon, you can link your account and track the inventory from one place.
So to sum up the pros of Shopify:
- No need to code
- Tons of free themes to choose from
- Can purchase your domain directly through Shopify
- Built-in inventory management
Shopify Cons – Shopify Isn’t for You If…
…you are looking for a completely customizable solution, with complete control of the hosting, expenses, code, and speed of your store.
Shopify is also more expensive to run than if you were to host your store through a third party, like Bluehost. Its cheapest plan starts at $29 a month and can go all the way up to $299 for the advanced plan.
If you want to use features like abandoned cart recovery (which is a must for any serious online retailer), you will have to spend a minimum of $79 per month. Not to mention that many of the plugins on Shopify are paid, and some even charge monthly subscriptions for their use. This can quickly increase the cost of running your store.
Alternatively, you can use WordPress and the WooCommerce plugin, but it typically takes a lot more fiddling to set up, and you will more than likely need to hire a developer to make sure everything’s running smoothly. But if you are familiar with WordPress and don’t mind playing around under the hood, then WordPress and Woocommerce could be a viable alternative.
So to sum up the cons of Shopify:
- Not ideal if you are looking for a customized solution
- Plugins and add-ons cost extra
- $79 minimum for abandoned cart recovery
However, if you are looking for a super simple, all-inclusive setup — and you’re not too worried about customizing things — then Shopify is probably the right platform for you. And consider that for a little extra money, you are paying for the convenience of having everything ready to go on a rock solid platform in less than an hour.
That’s a pretty big deal for the busy ecommerce business owner.

How to Set Up Shopify, Step by Step
So if you’ve decided a Shopify store is the right play for your business, then it’s time to get your Shopify storefront up and running.
Let’s walk through the process of setting up your first Shopify store, one step at a time. All you will need is your computer, an internet connection, and some product images to upload.
You’ll also need a credit card later in the setup to push your store live during the trial and establish payments; however, you won’t get charged unless you continue to use Shopify after your trial is over.
Let’s kick things off by creating your account.
Create a Free Trial Account
Navigate to the Shopify website, and enter your email in the “Get started” field.

Once you click “Get started,” you should see the following:

To start your 14-day free trial, you will need to set a password and enter the name of your store. Ours is called Amazing Potatoes.

Here it will ask you a little about yourself, such as if you are already selling products, and if they are physical or digital in nature. To help us get started, select “I’m just playing around”, and in the revenue field, select “Not started selling yet.”
You will be prompted to fill out your business address. If you don’t have one yet, just put in your home address for now so we can continue with the setup — you can always change your address later. Once you’ve done this, we can get into the fun stuff.
Select a Theme
There should be three options on your screen: add a product, add a theme, and add a domain. Let’s start with setting up the theme for our store.

Click “Customize theme” under “Customize your online store to match your brand.”
Scroll down to “Free themes” and click on the “Explore free themes” button.

Here you can click on each theme and browse the descriptions. Some themes are more geared towards a specific product category over others. Pick one that suits your niche.
For this example, I’m choosing the “Brooklyn” theme, which offers me two style options. I’m going with the playful style, because my store is going to be selling super fun products!

Once you’ve added your theme, you should get this notification confirming it has been successfully added:

If you click “Customize theme,” you will be able to access the theme editor, and adjust the layout and content any way you like.

Here you can change the content of your store, add images and text, change your featured image, or remove sections entirely that you don’t want. Once you’re done making changes and are happy with how things look, click “Save” in the bottom left of your screen.
Now, it’s time to add some products to your store.
Add a Product
There are a few ways you can add products in Shopify. You can manually add your own products and upload the necessary details, or use Shopify’s integration with the Oberlo app to directly source your products. Oberlo is an app where you can find products which can be drop shipped directly from Aliexpress. An alternative, if you don’t want to use Oberlo for sourcing products, is a service called Salehoo, which is similar.
If you sell on eBay or Amazon, you can add either platform as a sales channel by going to “Settings,” then “Sales Channels,” then “Add sales channel.” For more information on how this works, see the Shopify Help Page.
To keep things simple, we are going to show you how to upload a product manually.
Click “Products” on the left menu of your home screen, and click “Add product.”

Our lovely potato image comes courtesy of Potatohack.com.
Here you can fill out your product name, description, upload photos, apply tags, add the product category, and add the vendor (if there is one). Make sure you put some thought into the text you enter for your product description and the quality of the photos you upload. They will have a direct impact on how your product is perceived (no iPhone photos!).
Next, you will need to set a price for your product, and check the box if you will be collecting sales tax on each sale. Shopify can automatically collect sales taxes on your behalf if you choose.

If you have any other product identification information, such as barcode numbers or stock keeping units (commonly referred to as a UPC and SKU codes respectively), you can add that here.
If you would like Shopify to track your inventory, select “Shopify tracks your inventory” and set the number of items available for purchase. This means that if you sell all 10 potatoes, as in this example, Shopify will show the item as out of stock and prevent any further orders until this number is updated.
There is an option here to allow customers to keep purchasing even if you are out of stock; however, it would be better to leave this box unchecked. Overselling product you don’t have can lead to legal issues in some jurisdictions if you cannot fulfill the orders, and it’s generally considered bad service to oversell, which results in upset customers.
You can use Shopify to sell both physical and digital products. If you have a physical product, tick the box “This product requires shipping” and enter the dimensions and weight of the product.

Fulfillment is how your products will be delivered to your customers once they purchase your products. We will be sending our products out ourselves, so select “Manual” fulfillment for now. If you intend on using Amazon or another third party fulfillment service, you can change this setting later.
You also have the option to add variants (useful if you have different colors of the same product or sizes).
You can also get an SEO preview which shows how your listing will look in Google search. This is handy if you rely on organic search traffic to find your store.
When you are done setting up your product, click “Save” in the top right of your screen.

You’ll get a nice little congratulatory message for adding your first product and a link to continue with store setup, which takes you back to the home screen. Click the link, or the home icon in the menu on the left side of your screen, to continue.

If you like, you can preview your store by clicking the eye icon on the left-hand menu.

Amazing Potato header image courtesy of Almanac.com.
Now that is a pretty sweet looking potato store!
Now that we’ve set up our theme and added a product, it’s time to sort out our domain name.
Add a Domain
Go back to your shop home screen, and click the “Add a domain” button. From here, you can choose to add an existing domain if you already own one, or if you don’t have one yet, you can pay to register a domain with Shopify.

If you are adding your own domain, you will need to follow the instructions provided for your domain provider (e.g., Namecheap, GoDaddy, etc.) to connect your domain to Shopify.
Last Steps
To set up your payments and get your store live, you will need to select a Shopify plan. Don’t worry — you’re setting up just to try out Shopify; you won’t get charged until the end of your trial period. If you decide you don’t want to go ahead with the store, make sure you cancel the trial before your 14 days are up (Shopify will tell you what date you will need to cancel by).
Otherwise, let’s complete this setup process and get your store up and running.
Choose Your Plan
To select a plan, click the “Select a plan” button on the home screen. You can always change your plan later via settings.

We are going to choose the lowest priced plan at $29. Please note that the cheapest plan provides only basic store functionality for selling your products online. If you need more advanced features, such as gift cards, reports, and abandoned cart recovery, you will need to select the $79 Shopify plan. Don’t worry though; you can upgrade at any time — which means you can scale the features of your Shopify store as your business grows.

At this point, Shopify will ask you for your credit card information, which you will need to enter to continue setting up your store.
Complete Your Payment Details
Shopify does not have a shortcut from the homepage of your store to set up your payments. This is because if you are in a region that supports Shopify payments (powered by Stripe), Shopify will automatically select that option for you. However, to actually receive money to your business bank account or set up an alternative provider, you will need to go into your Stores settings to configure which account you want your money placed in. Let’s do that now.
Go to Settings, and select the “Payments” option.

Click on “Complete account setup” for Shopify payments.
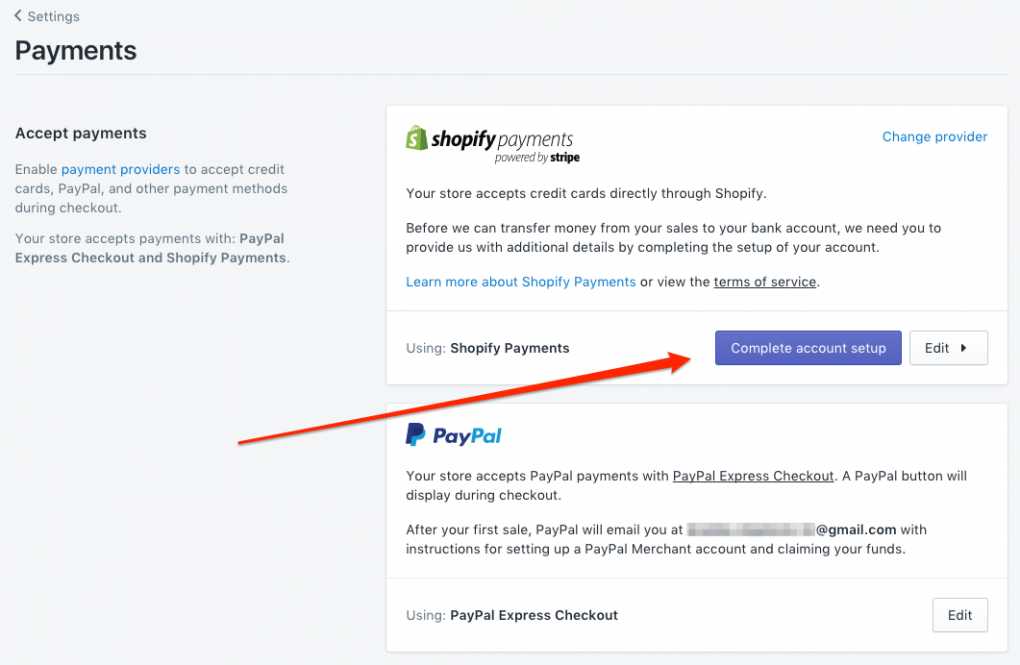
This is where you will enter the details of the bank account, where the income from your sales will go.
While Shopify supports other payment methods, Shopify Payments and Paypal Express are selected by default. Both Shopify Payments (powered by Stripe) and PayPal Express charge their respective standard rates.
If you want to use PayPal, you will need to set up a merchant account. You can either do this yourself by logging into Paypal and upgrading to a merchant account, or wait until someone makes a payment on your Shopify store with PayPal. After the first payment is made, PayPal will automatically send you an email with instructions for setting up your merchant account.
Make Your Site Public
At this point, your site is protected from public view by a password. In order for people to be able to visit your site and browse your products, you are going to have to disable this password protection. Click the button on your home screen that says “Remove password page”.

Un-check the box that says “Enable password page” so people can start visiting your site.

Hit “Save” and your site will be visible to the world.
You don’t have to remove the password yet if you are not ready. You can skip over this step until later and make the store public once you’ve finished uploading all your products and completed the rest of the setup.
That’s It! Your Store Is Live!
Assuming you’ve removed the password to your site, your store is officially live! Congratulations.
Of course, this is a super quick walkthrough on how to set up your store on Shopify. Starting (or expanding) your first online retail business takes a lot more work in the early stages before you get to this point. You will need to do your research on the niche you are entering into, source suppliers, come up with a brand, and finally, drive customers to your virtual door so they can buy your products.
Or you can take the easy route to success in the online business world— just purchase an existing store from our listings here on Empire Flippers, which already have all the hard work done for you, and start generating revenue from day one.
So, how are you going to build your Shopify Empire?
Photo credit: wabeno